
The presence of dirt, dust, mill glaze, chemical contaminates, or non-compatible finishes will compromise adhesion of the Lifeline finish to the wood. In addition, sanding exterior surfaces using sandpaper or Osborn Brushes finer than 80 grit will also prevent proper finish adhesion since Lifeline finishes need some surface texture in order to bond tightly to the wood fibers. However, even with coarse sanding the final finished surface will be quite slick and smooth. If you have any questions about what constitutes proper surface preparation, call a Perma-Chink Systems location before proceeding.
For weekend do-it-yourselfers we recommend working on one wall at a time, start to finish. It is better to complete one entire wall than it is to have several walls in some stage of the process and be interrupted for days, weeks or months by a change in the weather or other unforeseen circumstances. Also be aware of extreme temperatures when applying finishes to the log home. For guidance, review our Tech Tip on Application Temperatures.
Equipment to Have on Hand
- Ladders, ladder jacks and platform, if necessary
- Electric Drill
- Paint mixer (available from Perma-Chink Systems or most paint stores and DIY outlets)
- An airless sprayer equipped with a 0.015 or 0.017 orifice tip
- A high quality stain brush
- Clean rags
- Although our finishes may be applied with a brush or pad, they are designed to be most easily applied using an airless sprayer. Using one will result in a more uniform, professional looking finish. Do not use a pump-up garden type sprayer!
Weather Conditions
You don’t want to start the job if there is a chance of rain within the next 12 hours. You also don’t want to stain a wall if it’s going to be in direct, hot sunlight during the staining process. If it’s a clear day and you are working on a south or west facing wall, start early in the morning before the sun starts beating on it, but make sure it’s dry. It’s better to work on a wall that’s a bit cool than it is on a wall that’s still hot from being exposed to the sun for most of the day. High surface temperatures accelerate the drying process and you may not have sufficient time to properly brush out the product. The labeled ambient temperature application range is between 40°F and 90°F. Note that it is the surface temperature of the logs that is most important, not the temperature of the air. This is especially important during the winter when you can get a nice February day, but the logs are still frozen. You may need a few warm days before the temperature of the logs reaches the 40°F+ range.
Application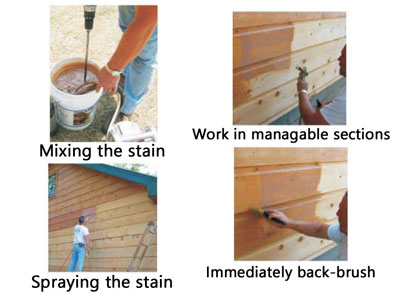
Mixing is also required for all clear Lifeline exterior finishes, including Prelude™ and Advance™ Gloss or Satin. When using pigmented stains we also recommend “boxing” containers to avoid any slight color differences as you go from container to container. The best way to do this is to mix up each pail then pour some Lifeline from at least two pails into a separate container. As the working container gets low add additional Lifeline, but be sure to mix the pail again before pouring any stain from it.
Step 1: Remove the lid from the pail and stir the contents for at least 5 minutes using an electric drill and a paint mixer. Be sure that all of the pigment is uniformly dispersed throughout the finish and there is no pigment still adhering to the bottom of the pail.
Step 2: Set up the airless sprayer according to the manufacturer’s directions or if brushing, pour a small amount into a separate container. Manually mix the pail whenever additional material is removed and occasionally turn on the sprayer’s re-circulator during use.
Step 3: Start your application at the top of the wall and work your way down. This avoids having to set your ladder against a wet finish and allows you to work out any drips and runs that may occur during the application process.
Step 4: Work on one or two courses of logs at a time. Hold the spray tip about a foot or so from the surface and apply the finish to no more than two running feet of logs. If the Lifeline™ begins to run down the wall you are applying too much.
Step 5: Once applied, immediately back-brush the area making sure to get Lifeline into all of the checks and fissures in the wood. Continue back-brushing until you have spread the Lifeline out as far as it will go. Lifeline finishes are made to go on in thin coats. If your brush becomes saturated, it is an indication that you are applying too much finish.
Step 6: While maintaining a wet edge, continue the application process until you come close to a break point like a window frame or butt end of the log. Never stop in the middle of a log. If you do, you may end up with a lap mark that will be difficult or impossible to hide. When you get close to a break point, feather the edges and empty the brush. Then start to spray from the opposite direction so you can blend the stained areas together and avoid lap marks.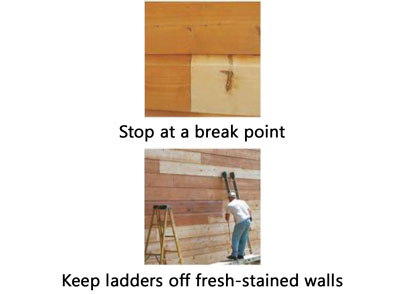
Step 7: Continue the application process, working your way down the wall. Once the finish coat is dry, you can move your ladders and complete the logs that you may have skipped to make room for the ladders. If you need to take a break, be sure to submerge your spray tip in water to prevent it from blocking up with dried product.
Step 8: Allow the finish to dry before applying subsequent coats. Drying time depends on temperature and humidity. In warm, dry conditions the surface may be dry to the touch in as little as one hour. On the other hand, on a damp day when the air temperature is below 50ºF it may be impossible to apply more than one coat per day.
Step 9: Lifeline Advance Clear Gloss and Satin Topcoats are best applied using exactly the same application techniques as the color coats. However, boxing containers is not necessary since they are colorless. Advance is somewhat sensitive to cool, moist weather, and if it has not had an opportunity to dry before the sun sets, cool evening dew can cause “blushing,” a hazing of the finish created by the interaction of water with the uncured Advance topcoat. In the spring and fall when evening temperatures drop below 60°F, it’s best to apply Advance early in the day so that it gets several hours of drying time before being exposed to the evening dew. Blushed Advance will turn clear after a few warm, dry days.
Step 10: Clean brushes, tools and equipment with soap and water.
Tips and Bullet Points
- Never use sandpaper, sanding pads or Osborn Brushes finer than 80 grit
- Make sure the surface has been cleaned within seven days of applying the first coat of Lifeline. Do not use bleach! Log Wash™ is a much better product to use.
- Check the weather forecast. Do not start if there is a chance of rain before the finish has a chance to dry.
- Ambient air temperatures should be between 40°F and 90°F at the time of application. Log surface temperatures should be between 40°F and 160°F
- Thoroughly mix all Lifeline finishes before and during use
- Use high quality brushes
- Do not use a pump-up sprayer or a roller to apply Lifeline
- Use a 0.015 or 0.017 orifice tip on airless sprayers
- If working up high, use ladder jacks and a platform
- Apply thin coats, back-brushing is critical
- Work on one or two courses of logs at a time
- Do not stop in the middle of a log. Continue to a break point.
- Start at the top of a wall and work your way down the wall
- Do not lean ladders against freshly stained surfaces
- Allow adequate drying time between coats
- During the cool spring and fall months do not apply Advance Topcoats late in the afternoon
- Clean your hands and tools with soap and water before the Lifeline dries
If you have any questions, give us a call at 1-800-548-3554, we are more than happy to help with your project.